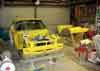
Fitting Fiberglass arches to MK 1 Escort
This is a fairly big job and not for the faint
hearted. I got a mate who has done some glass work before, to help
me.
The method of fixture is varied. You could just
bond them on with some flexible sealer and countersunk rivets and
paint over this if you desire.
There are also some excellent polyurethane bonding
substances available, rather than fiberglass resin etc. However
after consultation with manufacturer it was deemed that this could
move around, and crack at the joins, with metal work.
Purchasing the flares is relatively easy. Though
the quality does vary. I had some problems with the very lower edges
of the front flare rear and the rear flare front lower edges. My
advice would be to trial fit them at purchase time.
Settling on the correct positioning of the flare,
is the next thing to consider. The arches themselves should have
indents where the body line crease is. However you may not consider
this to be the right place.
After lots of searching on the net, looking at
pictures, I came to the conclusion, that the top of the flare, where
it first touches the metal work, should be level with the door handles,
in relevance with the body line, of the MK1. Having said that, if
I were to do it again, I would probably put them slightly lower.
Next we need to settle on the forward - aft relation.
I achieved this, at the front, by taping them in place and turning
the wheels, from lock to lock. Even then, I had to trim the lower
front part. The rears are slightly more straight forward. There
needs to be a gap, at the front, but a bigger gap is needed at the
rear, to allow for the wheel to come up and back as it travels over
a bump etc.
The fiberglass needs to be trimmed away to allow
about 1 inch of overlap with metalwork. I also feathered [tapered]
this edge so that it was as thin as possible at its perimeter. A
small angle grinder is used to trim fiberglass. Once you are satisfied
with the positioning of them, screw them on with self tapers., after
drilling a clearance hole in fiberglass. This edge is then be marked/scribed
onto metal work for reference later.
Front:-
With the front arches removed, you will see your reference line.
You now need to calculate and mark your cut line, which will be
the arches foundation/bonding area. Quite a bit of metal needs to
be removed. Refit the arch and check your fit.
I slightly curved up the lip, of the metal guard
edge, to conform with the fiberglass, for a better fit. Check to
see that the bonding areas are touching and remove high spots with
the sander, as required. Roughen up both surfaces with 36 grit paper.
Fiberglass international, for example, have outlets
in most states of OZ. Tell them you want to bond these fiberglass
flares onto metal. You will need approx. 2 liters of resin, the
one with the wax in it is best, [G.P. Polyester] and of course the
hardener/catalyst. Some talcum powder, as filler [which can be bought
from the local supermarket, about two bottles, or FGI]. There is
also a filler called "spheres" but it is relatively expensive,
the powder works fine and smells better! There are some accessories
needed to mix and apply all this. Cups, rollers brushes, etc. but
this is all relatively in expensive and can be also purchased at
the fiberglass retail store.
I mix the resin in a paper cup, via a kitchen
scale, to calculate hardener, and add enough powder, after stirring,
so that the liquid resin, just doesn’t run [semi fluid] or
that it doesn’t run too much!, as most of the work is done,
either upside down, or on vertical surface, Two people make it all
heaps easier at this stage. Spread the mixture onto the flare with
a spatula, leaving it about 2 to 3 mm thick, then gently place flare
into position, and do up the self tapers. Tidy up the excess with
a rag etc. When it’s dry, remove screws and fill these holes
with more resin etc. The self tapers must come out as they will
let moisture in and will inhibit even expansion, which leads to
cracking.
A good fit prior to bonding on is crucial. Sand
back with 40 grit paper, blending all in. I use a round piece of
hose wrapped with sand paper, to get contour right. To make it really
strong I put some strips of "surfboard finish matting"
[fine finish] over the fitted flare. This was done in small pieces
[200 mm long x 60 mm high] to avoid too much overlapping/wrinkles
so that the finish is good. Layer up the matting [2 layers] as normal
and place on join area, then work in resin with brush, till its
smooth.
Then its all bogging [filling] and sanding etc
ready to paint etc. Under the guard needs to be as good as you want
to make it. However it needs to be smooth and crevice free, to detract
dirt/water ingress between the metal and fiberglass.
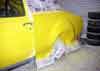
Picture of front ready for paint.
Rear:-
The rear is the trickier, and will take the longest.
Welding is required.
After trimming, screwing down and marking out, as the fronts, then
removing flare, the outer guard metal work was cut at the same height
as the inner guard at the join in the boot area. I used a piece
of 1mm steel 1440mm X 175, per side, rolled up by hand, to fill
the rear section. This is plug welded to existing wheel well and
then joined to outer guard as shown.
If I put my hand up inside the rear arch there
is a gap there that could be filled with say a plastic/rubber/metal
strip fixed to inner wheel well, though I didn’t do this,
you should.
There will probably be some repairs needed to these
areas, so you might as well tend to them now! Fill all seams with
a flexible putty, that is paint compatible.
Then, the arches, are bonded on and sanded, very
similar to the fronts, then painted...

Picture of the inner boot area finished.
Picture of rear outer finished.
RM Escort 2-10-00.
Roger Miller
17-5-02
|