| How-To Section:
Modify your Pinto head
No I don't mean a haircut or chopping off your
ears, I mean of course modification to the cylinder head of the
ubiquitous Pinto engine fitted to most RH7s. There is cheap power
to be had here by removing and reshaping selected bits of metal,
the cost is staggeringly low and the benefits obvious. A good head
job (oo-er) can give gains of 10-20BHP. Who among us would not like
some extra horsepower without spending an arm and a leg and with
no penalties?
The subject of cylinder head modification is often
considered a 'black-art' and many people will not even attempt modification
fearing that the engine will turn into a fire spitting intractable
beast. Not so! Coaxing extra power from a production engine is all
about improving the volumetric efficiency of the engine E.G. improving
its breathing. The more air/fuel mixture into the engine, the bigger
the bang and therefore the more horsepower. The thing that usually
makes an engine intractable is too wild a choice of camshaft.
When a head is modified (within reason) you are
simply improving on the existing design and efficiency, this should
yield very good results across the rev range without affecting the
nature of the engines power delivery.
I have modified many cylinder heads over the last
twenty years or so, pre-crossflow, Crossflow, Pinto, Imp, Mini,
MGB, Hillman, Triumph, Vauxhall, BDA, BMW, Jaguar, Cosworth etc.
and all have responded well to some simple modifications, others
to much more drastic ones! I will not go into too much detail about
why and how the following modifications for the Pinto head work,
but I will show what they are.
Tools required
Although a die-grinder is a nice tool to have,
an ordinary Black and Decker type drill together with some mounted
point grindstones are sufficient to modify a Pinto head, sure a
die-grinder will be much faster, but a drill is adequate. For finishing
around the valve seats, a short (3") piece of 12mm dowel with
a slot cut in it and some 280/400 wet or dry paper mounted in a
drill and run at low speed will suffice. A sturdy vice, properly
anchored is also a good thing when reshaping the valves. Don't forget
to wear a mask when removing metal or your lungs will end up rusty.
(It is also wise to run a hoover with a funnel attached to remove
the grit as you grind - don't tell the wife!).
Favourite myth
Polishing a head improves power - rubbish, polishing
of a head is a waste of time on a road engine and is only done to
make heads look well finished, it is the shape and therefore the
affect on laminar flow which is critical. If anything on a Pinto
head the outer part of the port should be left very rough ground
to help atomise the fuel/air mix.
Combustion chamber
Shrouding, where the combustion chamber wall inhibits
flow into the cylinder is prevalent on many heads and the combustion
chamber wall has to be cut back to reduce it. However this is not
so on the Pinto, in fact for extreme head work, material is added
to the chamber to promote flow. Only minor work is required in the
combustion chamber to cut the wall back to the gasket line at the
sides of the combustion chamber (see diagram), and to generally
clean up any casting marks. Sometimes, especially if the valve seats
have been heavily cut, the valves are 'pocketed' E.G. sunk in to
the head. If your head has this problem, careful relieving of the
face of the combustion chamber should alleviate the problem. Use
some old valves thinned down to protect the seats when doing this.
The head will then need extra skimming to maintain the compression
ratio.
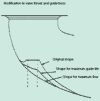
Inlet ports
The Pinto engine was originally designed in the
'states as a 2.3 litre engine for the Ford 'Pinto' (essentially
an American Capri) and the inlet ports reflect this capacity, in
that they are already too large. Because of the sharp turn in the
port and the angle of entry of the fuel/air mixture, the bottom
third of the port carries virtually no flow (see diagram). It is
wise to concentrate on the upper part of the port and the far side
of the valve seat. As stated the port is already too large, so all
that is required in the first part of the port leading to the valve
guide boss is a cleanup of any bad casting marks and a smoothing
of the bevel at the manifold face. For extreme head work, part of
the bottom of the port is actually filled in.
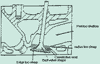
Standard inlet port showing imperfect areas
Standard and Sierra IS port shapes
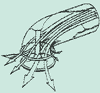
Diagram showing main part of inlet flow when valve is at part
and full lift
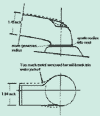
Valve guide boss
The valve guide boss does a good job of inhibiting
flow in the upper part of the port where most of the flow takes
place, reshaping or removing the boss has a marked affect on flow
through the port. Shortening or removing the guide boss does have
an affect on guide life however, but bearing in mind the average
annual mileage of an RH7, this should not be a problem, if you are
nervous about removing the guide, reshape it to the shape shown
(see diagram).
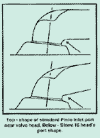
Valve throat and seat
The valve throat is the area where most attention
needs to be paid, the angle of entry of the fuel/air mixture, coupled
with the angle of the valve mean that most of the flow takes place
across the far side of the seat. A small venturi leading into the
seat at this point (see diagram) assists flow greatly at the middle
point of valve lift and is a worthwhile modification. The valve
throat itself should be opened to 1 9/16 inches diameter and blended
into the rounded part of the port, ensure that any machining marks
are blended into the valve throat. To get the valve throat size
right, use an old inlet valve and reduce its diameter to 1 1/2 inches
by spinning it in a drill and using an old grinding disc to remove
the material. This can then be slid into the guide and used as a
template for the valve throat size. The valve seat itself can be
thinned to about 1.0-1.5mm (thin from the inside) with a gentle
radius leading into the seat from the throat all the way around.
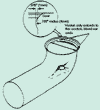
Modification for venturi on far side of seat
It is a good idea to lap the valve in a little
first before reshaping the throats and seats to see which part of
the seat is actually being used as they are often way too wide and
not always concentric. Do this after reshaping the inlet valves
as shown later.
Remember to thin the seat carefully from the inside,
as flow takes place at the rim of the valve, the larger the effective
circumference of the valve throat (NOT the valve) the more flow
is imparted. This is why multi-valve engines are so much more effective
than two-valve; throat circumference is radically increased.
Inlet valve
The standard inlet valve is heavy and badly shaped,
and the seat is way too wide. The edge of the seat where it meets
the back of the valve is also at a sharp angle; this causes a lot
of turbulence and therefore inhibits flow. The ideal shape for an
inlet valve is flatter with the edge of the seat radiused into the
back of the valve. (see diagram). To re-shape the inlet valves place
one in the chuck of a drill on high speed, place the drill in a
vice and use an old angle grinding disk to re-shape the back of
the valve and thin the seat. Be careful not to touch the stem with
the disk, or to neck the valve. When the shape is right and the
seat the correct width, finish with 280/400 wet/dry and WD40 (don't
burn your fingers!). As well as the seat modification reshaping
the valve to a 'penny on a stick' shape, E.G. a flatter back will
improve matters further.

Modifications to standard inlet valve
Exhaust ports
The exhaust port is a not a good shape and has
a sharp turn immediately following the valve throat, this seriously
restricts flow as the gas exits biased toward this port wall and
bounces off it. Unlike the inlet port, the exhaust port is for the
most part too small and needs opening at the top and left-hand side
at the manifold face. Careful reshaping of the port wall can redirect
the flow and improve matters radically. (See diagram)
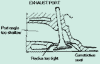
Valve throat and seat
The valve throat needs to be blended into the port
at the outside and radiused into the edge of the valve seat which
should be 1.5-1.8mm in width. Again trim back the valve seat width
from the inside of the throat and use a gentle radius to lead the
throat into the seat. On the short side of the port is a sharp angle
(see diagram) round this and radius into the seat.
Valve guide boss
Although the guide boss causes a serious restriction
to flow, it is unwise to remove it completely as it helps with heat
dissipation, careful reduction of the size of the boss can improve
flow and still retain the heat transference properties. (See diagram).
It is a good idea to lap the valve in a little
first before reshaping the throats and seats to see which part of
the seat is actually being used as they are often way too wide and
not always concentric. Do this after reshaping the exhaust valves
as shown later.
Modifications to exhaust port, throat and guide boss
Exhaust valve
The standard exhaust valve is not too bad considering
its function, however the seat is too wide and the edge of the seat
where is meets the back of the valve is at a sharp angle, this causes
a lot of turbulence and therefore inhibits flow. The ideal shape
for an exhaust valve is rounded across the edge of the face, leading
to a narrow seat, with the edge of the seat cut back at approximately
30 deg. or radiused. To re-shape the exhaust valves place one in
the chuck of a drill on high speed, place the drill in a vice and
use an old angle grinding disk to re-shape the back of the valve.
Thin the seat and radius the edge of the face, be careful not to
touch the stem with the disk, or to neck the valve. When the shape
is right and the seat the correct width, finish with 280/400 wet/dry
and WD40.
Modifications to standard exhaust valve
Raising Compression Ratio
Pinto engines love compression especially with
wilder cams. For a road engine running a standard or fast road cam
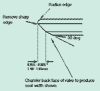
up to 285 deg duration 40-50 thou skim should raise the CR by one
point which is ideal. For cams up to 300 duration, 60-80 thou should
suffice, for those above 300 degrees (you should be using a big
valve head anyway) 100 thou will suffice. Make sure you skim the
head AFTER you have modified it, or you may mark the head face when
doing the modification.
Exhaust Manifold
If you have an RHE supplied 4 into 2 into 1 exhaust
manifold, look carefully at the point where the primaries join the
exhaust flanges, there is usually a large build up of weld inside
the pipe, this should be ground down as it seriously affect flow.
The RHE design is fundamentally flawed in design and has too many
turns, and the collectors are too short. The very latest 4 into
1 manifold, while not perfect (the collector is too short again)
is a far better design, and is probably worth 10 or so horsepower
over the earlier one. These are available from RHE at a cost of
80 pounds or so and are good value for money.
Dave Andrews
<
BACK
|