| How-To Section:
Install aVolvo 4-pots on a Capri or Escort Mk1
& MK2

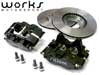
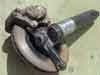
Mk2 Escort strut with Volvo 4 pot caliper and Capri 2.8i disk
This
is a small “step-by-step” description on how I would do
this again. This is just based on the way I did it, you might want
to use different methods for brake bleeding etc. Any fiddling with
the brakes seriously affect the safety of the car, so be sure you
know what you are doing.
Stuff
needed;
·
One pair of Volvo 140, 160, 140 or 260 front
brake callipers. Be sure they match (vented/solid) the discs you
will use. 140 and early 240’s have solid front discs. I used
ATE callipers, some Volvos had Girling callipers, I suspect these
would work just as well.
·
A set of brake pads for the above
·
Two pieces of brake line “T”-couplings
·
Four pieces of brake line (approximately 15 cm
each), with “male” fittings each end, to suit the T-coupling
and the Volvo calliper
·
A set of vented discs to fit the Capri (lucky
2.8i owners already have these), this is optional but recommended
·
A couple (4 at least) of
M12 washers
·
Normal hand tools (a vice is great to have)
Get
to work
1.
Loosen the front wheel nuts, and
jack up the front of the car and support on axle stands
2.
Remove the road wheels
3.
Place a bit of plastic sheet film
(like the one used in the kitchen to preserve food…) over the
brake fluid reservoir opening (remove the cap first…). This
will reduce the amount of brake fluid that runs over you hands later…
4.
Loosen the brake pipe fitting in
the Capri calliper, and either remove the entire brake pipe, or
bend it out of the way. If this pipe is in good nick, it can be
reused, so be careful.
5.
Remove the brake calliper
6.
If you need to change your discs
as well, do that now. This would also be a good time to replace
the front wheel bearings.
7.
Compare the old Capri calliper to
the Volvo 4-pot. You will notice that the mounting holes are spaced
a bit different.
8.
File the mounting holes in the Volvo
calliper to an oval shape, to match the mounting lugs on the strut.
Take care to file both holes approximately the same amount. Note
that the callipers mounting lugs already are shaped to accommodate
the oval hole.
9.
Trial fit the calliper on the strut,
with the brake pads fitted. Check that the disc is “centred”
between the pads. If not, pray that the difference is “the
right way”, so you can use washers between the calliper and
the mounting lugs to achieve this.
10.
When you’re satisfied with
the centring, tighten the mounting bolts.
11.
Trial fit the road wheels you will
be using, and check for clearance. If they are 14” or bigger,
there should be no problem. On my car the 13” “Ghia”
alloys just clear the calliper. My 7x13 Revolution 4-spoke
splits also work.
12.
Now it’s time to fit the brake
lines. As you can see, the Volvo calliper has two inlets. This is
where the “T”-coupling comes in handy. Either mount the
T directly on the Capri flexible brake hose, or to the end of the
old brake pipe on the strut. Then carefully bend the 15cm pieces
of pipe to fit the calliper inlets. You might want to add a brace
to the T-coupling to mount it steady. Vibration is not good for
brake pipes.
13.
Check all connections and bolts
for adequate tightness.
14.
Top up the brake fluid reservoir
15.
Bleed the front brakes. There are
three bleed nipples on the callipers, take the two on the side first
and last the “top” one.
16.
Check the brake pedal – it
should not feel spongy or “bottom out” against the floor.
If it does, bleed the brakes again. If this doesn’t seem to
cure the problem, you will have to fit another master cylinder.
See below
17.
Remount the wheels and put the car
on the ground
18.
Test drive carefully!
A
new master cylinder?
Sometimes
the standard Capri/Escort master cylinder can’t cope with the
new callipers. There are several options here. A Land Rover item
(LR series III Standard double circuit master cylinder Lucas Part
No. FMK177 (or equivalent)) should work, or do as I did, use a Volvo
240/260 master cylinder. This will need some altering of both the
master cylinder (new holes drilled) and the linkage (the pushrod
to the pedal needs to be extended by about 20-30mm). You may also
need to incorporate a brake proportioning valve to prevent rear
wheel lockup.
A
change in master cylinder may also mean you have to alter some of
the brake pipes. Caprisport (UK) have a set for a Sierra XR4i master
cylinder and booster, this may be an easier way to overcome the
problem.
This
text was written by Gustaf Ulander, May 1999 (edited in June 2000).
<
BACK
|